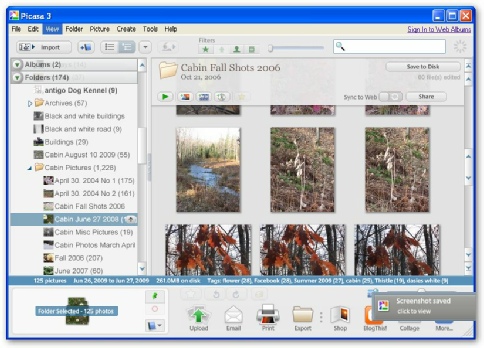
Picasa automatically organizes all your image and movie files into collections of folders inside its main Library view.
Parts of the Picasa window are shown below:

Library Tools
At the top of the Picasa main library screen are several buttons that help you add pictures to the library, view and find pictures in additional ways, and burn pictures to a CD. Frame.
Folder List
The left frame in Picasa library view shows all of the folders containing pictures on your computer and all of the albums you have created in Picasa. These folders and albums are grouped into collections.

Picture Tray and Output Options
The picture tray at the bottom is used to collect pictures or movies from one or more folders or albums so that you may work with them as a group. The picture tray contains a button for placing the collected items in existing albums or allows you to create a new album. It also has buttons with various output options for the collected pictures and or movies.
Light Box
The light box on the right hand side displays visual thumbnails of the pictures (or movies) corresponding to the folders and albums in the left frame.
Picasa is a photo management software from Google that helps you find, organize, edit and share your pictures.
Once you start Picasa, it scans your hard drive to find and automatically organize all your pictures. Picasa finds the following image file types including JPG, GIF, TIF, PSD, PNG, BMP, RAW (including NEF and CRW). GIF and PNG files are not scanned by default, but you can enable them in the options dialog. Movie file types: MPG, AVI, ASF, WMV, MOV.
Date modified 12-
| CIS 112 Home Page |
| CIS 114 Home Page |
| CIS 147 Home Page |
| CIS 221 Home Page |
| CIS 112 Class Calendar |
| Using the D2L Dropbox System |
| Educational Goals and Objectives |
| Projects |
| Using the D2L System |
| Project 3 Excel |
| Project 4 Working with Images |
| Project 5 Creating a Slide Presentation |
| Project 6 Creating a Publication |
| Project 8 Making a Movie |
| Adding Information to a Cell |
| Using Formulas |
| Formattin the Spreadsheet |
| Project 3 Excel Spreadshett |
| Starting PowerPoint |
| Adding New Slides |
| Adding Content to a Slide |
| Slide Transitions |
| Animating Slide Content |
| Introduction to Publisher |
| Working with Word Art |
| Creating Text Boxes |
| Inserting Images |
| WindowsMovieMaker |
| CIS 114 Calendar |
| Basic Pacasa Manual |
| Class Projects |
| Working with Folders |
| Renaming a File |
| Copying and Moving Picture Files |
| Organizing Pictures |
| Cropping PIctures |
| Lesson 1 Introduction to Web Plus X5 |
| Lesson 2 Working with Text |
| Lesson 3 Images |
| Lesson 4 Hyperlinks |
| Lesson 5 Final Project |
| Saving and Opening Documents |
| Using the D2L Dropbox System |
| Introduction to WebPlus X6 |
| Setting Up For Publishing |
| Publishing Your Web Site |
| Creating a New Web Site |
| Working With Text |
| Project 2 Text |
| Sample Text Page |
| Saving Image from a Web Page |
| Saving Images from a Image Search |
| Project 3 Images |
| Image Sample Page |
| Project 4 Navigation |
| Hyperlink Example Home Page |
| External Web Pages |
| Personal Photos |
| Contacting Me |
| CIS 221 Day Calendar |
| CIS 221 Night Calendar |
| Accessing the D2L System |
| Using the D2L Dropbox System |
| Using the Snipping Tool |
| CIS 114 Calendar |
| Basic Pacasa Manual |
| Class Projects |
| Working with Folders |
| Renaming a File |
| Copying and Moving Picture Files |
| Organizing Pictures |
| Cropping PIctures |